Getting started
Welcome to Making with Code! We’re glad you’re here! yay 😄
This lab will help you get your computer set up for the class and show you how to run your first computer program.
👾 💬 FYI
Hello! I’m the For Your Information Space Invader. I’ll be stopping by every once in a while to give you some extra information about labs or the content you’re learning.
Here’s my first FYI: Sometimes you’ll see 💻 in a lab. This means that you need do something that involves writing code or using your Terminal (MacOS) or Ubunutu (Windows). You can use these like little action items during labs.
[0] Setup
To get your computer ready, we need to configure the workspace you will use for the class. Select the tab for your operating system and follow the instructions. Please let a member of the teaching team know if you run into any issues.
💻 To begin, start your Terminal app
, type the following line into
the window that opens, and press return.
/usr/bin/python3 --version
You will probably see a popup window saying the command line developer tools need to be installed.
Click “Install” and follow the instructions. If you see a version number instead (like Python 3.9.9),
you’re all set and can continue to the next step.
💻 Check system requirements
- Go to
Settings > System > About. - Check that the Edition is Windows 10.
- Check that System type says “64-bit operating system…”
(based on this guide)
💻 Ubunutu
Follow along with this video until the ‘6:15’ mark, or follow the steps below. Once you have Ubunutu installed, skip below to “Download VcXsrv for graphics”.
Enable developer tools
- Go to
Control Panel > Programs > Program Features > Turn Windows Features On Or Off. - Enable the “Windows Subsystem for Linux” option in the list, and then click the “OK” button.
- Click “Restart now” when you’re prompted to restart your computer.
Download Ubuntu
- After your computer restarts, open the Microsoft Store from the Start menu, and search for “Ubunutu” in the store.
- Click
Getto install “Ubuntu”.
(Based on this guide)
Setup Ubuntu
- Open Ubuntu, it will take a few minutes to install updates.
- As prompted, create a username and password.
- Give your user admin privileges by typing
usermad -aG sudo your-nameand pressing enter (again, replaceyour-name).
💻Download VcXsrv for graphics
- Download VcXsrv from this link by clicking
Download App. - Install the package that downloads by double clicking on it and going through the install wizard.
💻Download Atom
- Download Atom from this website and install.
(This guide has instructions for installing shell commands to open files and projects in Atom)
👾 💬
Whenever this website says to use Terminal, you should use Ubuntu. There will be other small differences for Windows users that we’ll explain along the way.
💻 Now type the following commands into the Terminal window
one at a time. Press return after each one
to run the command. The first command installs the mwc program, which you’ll use throughout this course. The second
command will finish the setup process.
Note: You’ll be asked for the Making With Code URL. That’s this site, https://code.computationalliteracies.net.
pip3 install --user making-with-code-cli
mwc setup
[1] Into the Terminal
Take a peek at your Desktop. You should see a new folder called mwc created by the configuration
script. (If you told the setup script you wanted to install somewhere else, you’ll need to adapt the following instructions
to your situation.) We want to navigate to that folder using the Terminal interface to learn some Terminal skills
that will be useful throughout the class.
Terminal: a new user interface
You’re probably used to interacting with the files in your computer through a Graphical User Interface (GUI) like Finder. Terminal allows us to interact with the files in our computer through a Text-based User Interface (TUI). The files in our computers are organized in nested folders known as directories.
💻 Open a new Terminal window.
Terminal opens in your home directory, but we will be working in the cs9 directory.
Since the home directory holds everything we will be working with on your computer, the cs9 directory
must be somewhere inside the home directory (organized as a child directory or subdirectory).
Last login: Thu Aug 15 13:57:41 on ttys008
~$
What’s in your home directory?
💻
Type ls into the command line and press return. This will list all the files and subdirectories in the current directory.
~$ ls
Applications  Desktop  Documents  Downloads	 Library  Movies  Music	 Pictures
Here, you should see that Desktop is one of the subdirectories listed. Let’s move into that
subdirectory.
💻
Type cd Desktop into the command line and press
return.
cd stands for “change directory”. Now, list all the items in your Desktop
directory using ls.
~$ cd Desktop
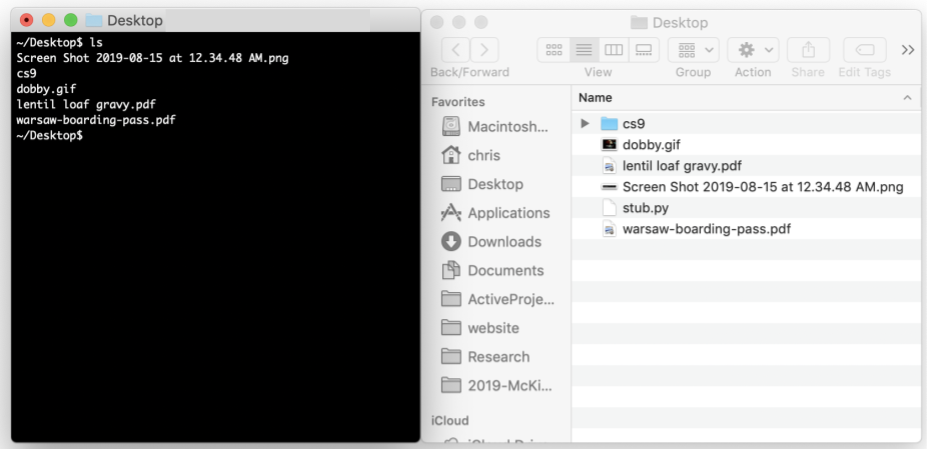
~/Desktop$ ls
Screen Shot 2019-08-15 at 12.34.48 AM.png dobby.gif warsaw-boarding-pass.pdf
cs9 lentil loaf gravy.pdf
Compare the output in the Terminal window with the Desktop shown by the GUI.
💻
Type open . to open Finder. All of the files and folders are the same!
The Terminal really does show us the same files and directories as our GUI!
Comparing Finder and Terminal files
Going back to the Terminal, we can also see that the cs9 subdirectory is inside the
Desktop directory.
💻
Change into the cs9 directory and list what
it contains. There is another subdirectory named unit_00, the directory we created
for you to hold everything for Unit 0. Change into that directory and we’ll be ready
to get started with some actual code!
~/Desktop$ cd cs9/
direnv: loading ~/Desktop/cs9/.envrc
direnv: export ~PATH
~/Desktop/cs9$ ls
env	unit_00
~/Desktop/cs9$ cd unit_00/
~/Desktop/cs9/unit_00$
👾 💬
Notice how something different happened when youcd’d into thecs9directory? A piece of software the install script installed calleddirenvjust activated a virtual environment for you Terminal session. Basically, it keeps the things you do or the software you install for the class from affecting other parts of your computer.
[2] Introduction to writing code
Now that you can navigate in the Terminal, let’s write some code! Throughout the class, we will be using the Python programming language to help us perform computational tasks. In this unit, we’ll be using a software library called turtle to draw things with code.
👀Watch or read the explanation of how to write and run Python programs below.👾 💬
The 👀 symbol is another helpful symbol to indicate that you need to do something. This one means that there’s something important for you to read or watch.
Writing programs
Python programs start out as simple text files. To write a Python program, we start out by writing a text file. During the setup, we downloaded a special text editor made for the purpose of writing code.
💻 Use the Terminal commands below to open a new file in Atom.
cd Desktop
cd cs9
cd unit_00
atom first_program.py
This should open a new Atom window with a tab that says first_program.py.
Python programs consist of lines of code that tell your computer what you want it to do.
💻
Paste the following lines of code into the first_program.py file in Atom:
from turtle import *

forward(50)
right(90)
forward(50)
right(90)
forward(50)
right(90)
forward(50)
right(90)

input()
Can you guess what these lines of code are telling the computer to draw?
Running programs
Now that you’ve written a program, let’s run it to see what it does!
To run Python code, we need to give our programs to a python interpretor. Fortunately,
we installed a Python interpretor in your Terminal during the setup. To use it,
you can use the command python file-name.py. This will read in the text file you
pass it, interpret it as a Python program, translate it into a format that your computer
can understand, and then give those instructions to your computer.
Let’s try it with the program you just wrote in Atom.
💻 First, save
first_program.py file in Atom using the** cmd-s keys.
💻 Run the program in Terminal
using the command, python first_program.py.
What happend? Did your computer draw what you expected?
💻 End the program
and close the turtle window by pressing return.
👾 💬
Most files in your computer have a file type that tells your computer how to interpret them. The file type is determined by the letters after the dot in the file name.
Notice that even though python programs are just text files, we’re saving it with the
.pyfile extension. This tells our computer that this file should be interpreted as a python file.
You just ran your first Python program! Congrats!! 🎉
Before we move on, here a summary of the commands you just learned:
[3] Let’s draw!
Now that you’ve got the basics, try to make it more interesting.
💻 Experiment with turtle commands below
by editing your first_program.py file
| Function | Input | Example Use | Explanation |
|---|---|---|---|
| forward | amount | forward(100) | Moves the turtle forward by the specified amount |
| backward | amount | backward(100) | Moves the turtle backward by the specified amount |
| right | angle in degrees | right(45) | Turns the turtle clockwise by the specified angle |
| left | angle in degress | left(45) | Turns the turtle counter clockwise by the specified angle |
| color | colorname | color(“red”) | Sets the color for drawing. Use “red”, “black”, etc. Here’s a list of all the colors. |
| shape | shapename | shape(“arrow”) | Should be “arrow”, “classic”, “turtle”, or “circle” |
| speed | number from 0-10 | speed(0) | Determines the speed at which the turtle moves around the window. 1 for slowest, 3 for normal speed, 10 for fast, 0 for fastest. |
| pendown | None | pendown() | Puts down the turtle/pen so that it draws when it moves |
| penup | None | penup() | Picks up the turtle/pen so that it doesn’t draw when it moves |
| pensize | width | pensize(4) | Sets the width of the pen for drawing |
Error and bugs
While trying this out, you may come across errors or bugs, do not fear! Write the issue down, and we can talk about it during class. Try to figure out whether your bug is a: